|
123456789101112131415161718192021222324252627282930313233343536373839404142434445464748495051525354555657585960616263646566676869707172737475767778798081828384858687888990919293949596979899100101102103104105106107108109110111112113114115116117118119120121122123124125126127128129130131132133134135136137138139140141142143144145146147148149150151152153154155156157158159160161162163164165166167168169170171172173174175176177178179180181182183184185186187188189190191192193194195196197198199200201202203204205206207208209210211212213214215216217218219220221222223224225226227228229230231232233234235236237238239240241242243244245246247248249250251252253254255256257258259260261262263264265266267268269270271272273274275276277278279280281282283284285286287288289290291292293294295296297298299300301302303304305306307308309310311312313314315316317318319320321322323324325326327328329330331332333334335336337338339340341342343344345346347348349350351352353354355356357358359360361362363364365366367368369370371372373374375376377378379380381382383384385386387388389390391392393394395396397398399400401402403404405406407408409410411412413414415416417418419420421422423424425426427428429430431432433434435436437438439440441442443444445446447448449450451452453454455456457458459460461462463464465466467468469470471472473474475476477478479480481482483484485486487488489490491492493494495496497498499500501502503504505506507508509510511512513514515516517518519520521522523524525526527528529530531532533534535536537538539540541542543544545546547548549550551552553554555556557558559560561562563564565566567568569570571572573574575576577578579580581582583584585586587588589590591592593594595596597598599600601602603604605606607608609610611612613614615616617618619620621622623624625626627628629630631632633634635636637638639640641642643644645646647648649650651652653654655656657658659660661662663664665666667668669670671672673674675676677678679680681682683684685686687688689690691692693694695696697698699700701702703704705706707708709710711712713714715716717718719720721722723724725726727728729730731732733734735736737738739740741742743744745746747748749750751752753754755756757758759760761762763764765766767768769770771772773774775776777778779780781782783784785786787788789790791792793794795796797798799800801802803804805806807808809810811812813814815816817818819820821822823824825826827828829830831832833834835836837838839840841842843844845846847848849850851852853854855856857858859860861862863864865866867868869870871872873874875876877878879880881882883884885886887888889890891892893894895896897898899900901902903904905906907908909910911912913914915916917918919920921922923924925926927928929930931932933934935936937938939940941942943944945946947948949950951952953954955956957958959960961962963964965966967968969970971972973974975976977978979980981982983984985986987988989990991992993994995996997998999100010011002100310041005100610071008100910101011101210131014101510161017101810191020102110221023102410251026102710281029103010311032103310341035103610371038103910401041104210431044104510461047104810491050105110521053105410551056105710581059106010611062106310641065106610671068106910701071107210731074107510761077107810791080108110821083108410851086108710881089109010911092109310941095109610971098109911001101110211031104110511061107110811091110111111121113111411151116111711181119112011211122112311241125112611271128112911301131113211331134113511361137113811391140114111421143114411451146114711481149115011511152115311541155115611571158115911601161116211631164116511661167116811691170117111721173117411751176117711781179118011811182118311841185118611871188118911901191119211931194119511961197119811991200120112021203120412051206120712081209121012111212121312141215121612171218121912201221122212231224122512261227122812291230123112321233123412351236123712381239124012411242124312441245124612471248124912501251125212531254125512561257125812591260126112621263126412651266126712681269127012711272127312741275127612771278127912801281128212831284128512861287128812891290129112921293129412951296129712981299130013011302130313041305130613071308130913101311131213131314131513161317131813191320132113221323132413251326132713281329133013311332133313341335133613371338133913401341134213431344134513461347134813491350135113521353135413551356135713581359136013611362136313641365136613671368136913701371137213731374137513761377137813791380138113821383138413851386138713881389139013911392139313941395 |
- # 简介
-
- `DBCP`用于创建和管理连接,利用“池”的方式复用连接减少资源开销,和其他连接池一样,也具有连接数控制、连接有效性检测、连接泄露控制、缓存语句等功能。目前,`tomcat`自带的连接池就是`DBCP`,Spring开发组也推荐使用`DBCP`,阿里的`druid`也是参照`DBCP`开发出来的。
-
- `DBCP`除了我们熟知的使用方式外,还支持通过`JNDI`获取数据源,并支持获取`JTA`或`XA`事务中用于`2PC`(两阶段提交)的连接对象,本文也将以例子说明。
-
- 本文将包含以下内容(因为篇幅较长,可根据需要选择阅读):
-
- 1. `DBCP`的使用方法(入门案例说明);
- 2. `DBCP`的配置参数详解;
- 3. `DBCP`主要源码分析;
- 4. `DBCP`其他特性的使用方法,如`JNDI`和`JTA`支持。
-
-
- # 使用例子
-
- ## 需求
-
- 使用`DBCP`连接池获取连接对象,对用户数据进行简单的增删改查。
-
- ## 工程环境
-
- `JDK`:1.8.0_201
-
- `maven`:3.6.1
-
- `IDE`:eclipse 4.12
-
- `mysql-connector-java`:8.0.15
-
- `mysql`:5.7.28
-
- `DBCP`:2.6.0
-
-
- ## 主要步骤
-
- 1. 编写`dbcp.properties`,设置数据库连接参数和连接池基本参数等。
-
- 2. 通过`BasicDataSourceFactory`加载`dbcp.properties`,并获得`BasicDataDource`对象。
-
- 3. 通过`BasicDataDource`对象获取`Connection`对象。
-
- 4. 使用`Connection`对象对用户表进行增删改查。
-
- ## 创建项目
-
- 项目类型Maven Project,打包方式war(其实jar也可以,之所以使用war是为了测试`JNDI`)。
-
- ## 引入依赖
-
- ```xml
- <!-- junit -->
- <dependency>
- <groupId>junit</groupId>
- <artifactId>junit</artifactId>
- <version>4.12</version>
- <scope>test</scope>
- </dependency>
- <!-- dbcp -->
- <dependency>
- <groupId>org.apache.commons</groupId>
- <artifactId>commons-dbcp2</artifactId>
- <version>2.6.0</version>
- </dependency>
- <!-- log4j -->
- <dependency>
- <groupId>log4j</groupId>
- <artifactId>log4j</artifactId>
- <version>1.2.17</version>
- </dependency>
- <!-- mysql驱动的jar包 -->
- <dependency>
- <groupId>mysql</groupId>
- <artifactId>mysql-connector-java</artifactId>
- <version>8.0.15</version>
- </dependency>
- ```
-
- ## 编写dbcp.prperties
-
- 路径`resources`目录下,因为是入门例子,这里仅给出数据库连接参数和连接池基本参数,后面源码会对配置参数进行详细说明。另外,数据库`sql`脚本也在该目录下。
-
- ```properties
- #连接基本属性
- driverClassName=com.mysql.cj.jdbc.Driver
- url=jdbc:mysql://localhost:3306/github_demo?useUnicode=true&characterEncoding=utf8&serverTimezone=GMT%2B8&useSSL=true
- username=root
- password=root
-
- #-------------连接池大小和连接超时参数--------------------------------
- #初始化连接数量:连接池启动时创建的初始化连接数量
- #默认为0
- initialSize=0
-
- #最大活动连接数量:连接池在同一时间能够分配的最大活动连接的数量, 如果设置为负数则表示不限制
- #默认为8
- maxTotal=8
-
- #最大空闲连接:连接池中容许保持空闲状态的最大连接数量,超过的空闲连接将被释放,如果设置为负数表示不限制
- #默认为8
- maxIdle=8
-
- #最小空闲连接:连接池中容许保持空闲状态的最小连接数量,低于这个数量将创建新的连接,如果设置为0则不创建
- #注意:timeBetweenEvictionRunsMillis为正数时,这个参数才能生效。
- #默认为0
- minIdle=0
-
- #最大等待时间
- #当没有可用连接时,连接池等待连接被归还的最大时间(以毫秒计数),超过时间则抛出异常,如果设置为<=0表示无限等待
- #默认-1
- maxWaitMillis=-1
- ```
-
- ## 获取连接池和获取连接
-
- 项目中编写了`JDBCUtils`来初始化连接池、获取连接和释放资源等,具体参见项目源码。
-
- 路径:`cn.zzs.dbcp`
- ```java
- // 导入配置文件
- Properties properties = new Properties();
- InputStream in = JDBCUtil.class.getClassLoader().getResourceAsStream("dbcp.properties");
- properties.load(in);
- // 根据配置文件内容获得数据源对象
- DataSource dataSource = BasicDataSourceFactory.createDataSource(properties);
- // 获得连接
- Connection conn = dataSource.getConnection();
- ```
-
- ## 编写测试类
-
- 这里以保存用户为例,路径test目录下的`cn.zzs.dbcp`。
-
- ```java
- @Test
- public void save() throws SQLException {
- // 创建sql
- String sql = "insert into demo_user values(null,?,?,?,?,?)";
- Connection connection = null;
- PreparedStatement statement = null;
- try {
- // 获得连接
- connection = JDBCUtils.getConnection();
- // 开启事务设置非自动提交
- connection.setAutoCommit(false);
- // 获得Statement对象
- statement = connection.prepareStatement(sql);
- // 设置参数
- statement.setString(1, "zzf003");
- statement.setInt(2, 18);
- statement.setDate(3, new Date(System.currentTimeMillis()));
- statement.setDate(4, new Date(System.currentTimeMillis()));
- statement.setBoolean(5, false);
- // 执行
- statement.executeUpdate();
- // 提交事务
- connection.commit();
- } finally {
- // 释放资源
- JDBCUtils.release(connection, statement, null);
- }
- }
- ```
-
-
-
- # 配置文件详解
-
- 这部分内容从网上参照过来,同样的内容发的到处都是,暂时没找到出处。因为内容太过杂乱,而且最新版本更新了不少内容,所以我花了好大功夫才改好,后面找到出处再补上参考资料吧。
-
- ## 基本连接属性
-
- 注意,这里在`url`后面拼接了多个参数用于避免乱码、时区报错问题。 补充下,如果不想加入时区的参数,可以在`mysql`命令窗口执行如下命令:`set global time_zone='+8:00'`。
-
-
- ```properties
- driverClassName=com.mysql.cj.jdbc.Driver
- url=jdbc:mysql://localhost:3306/github_demo?useUnicode=true&characterEncoding=utf8&serverTimezone=GMT%2B8&useSSL=true
- username=root
- password=root
- ```
-
- ## 连接池大小参数
-
- 这几个参数都比较常用,具体设置多少需根据项目调整。
-
- ```properties
- #-------------连接池大小和连接超时参数--------------------------------
- #初始化连接数量:连接池启动时创建的初始化连接数量
- #默认为0
- initialSize=0
-
- #最大活动连接数量:连接池在同一时间能够分配的最大活动连接的数量, 如果设置为负数则表示不限制
- #默认为8
- maxTotal=8
-
- #最大空闲连接:连接池中容许保持空闲状态的最大连接数量,超过的空闲连接将被释放,如果设置为负数表示不限制
- #默认为8
- maxIdle=8
-
- #最小空闲连接:连接池中容许保持空闲状态的最小连接数量,低于这个数量将创建新的连接,如果设置为0则不创建
- #注意:timeBetweenEvictionRunsMillis为正数时,这个参数才能生效。
- #默认为0
- minIdle=0
-
- #最大等待时间
- #当没有可用连接时,连接池等待连接被归还的最大时间(以毫秒计数),超过时间则抛出异常,如果设置为<=0表示无限等待
- #默认-1
- maxWaitMillis=-1
-
- #连接池创建的连接的默认的数据库名,如果是使用DBCP的XA连接必须设置,不然注册不了多个资源管理器
- #defaultCatalog=github_demo
-
- #连接池创建的连接的默认的schema。如果是mysql,这个设置没什么用。
- #defaultSchema=github_demo
- ```
-
- ## 缓存语句
-
- 缓存语句在`mysql`下建议关闭。
-
- ```properties
- #-------------缓存语句--------------------------------
- #是否缓存preparedStatement,也就是PSCache。
- #PSCache对支持游标的数据库性能提升巨大,比如说oracle。在mysql下建议关闭
- #默认为false
- poolPreparedStatements=false
-
- #缓存PreparedStatements的最大个数
- #默认为-1
- #注意:poolPreparedStatements为true时,这个参数才有效
- maxOpenPreparedStatements=-1
-
- #缓存read-only和auto-commit状态。设置为true的话,所有连接的状态都会是一样的。
- #默认是true
- cacheState=true
-
- ```
-
- ## 连接检查参数
-
- 针对连接失效和连接泄露的问题,建议开启`testWhileIdle`,而不是开启`testOnReturn`或`testOnBorrow`(从性能考虑)。
-
- ```properties
- #-------------连接检查情况--------------------------------
- #通过SQL查询检测连接,注意必须返回至少一行记录
- #默认为空。即会调用Connection的isValid和isClosed进行检测
- #注意:如果是oracle数据库的话,应该改为select 1 from dual
- validationQuery=select 1 from dual
-
- #SQL检验超时时间
- validationQueryTimeout=-1
-
- #是否从池中取出连接前进行检验。
- #默认为true
- testOnBorrow=true
-
- #是否在归还到池中前进行检验
- #默认为false
- testOnReturn=false
-
- #是否开启空闲资源回收器。
- #默认为false
- testWhileIdle=false
-
- #空闲资源的检测周期(单位为毫秒)。
- #默认-1。即空闲资源回收器不工作。
- timeBetweenEvictionRunsMillis=-1
-
- #做空闲资源回收器时,每次的采样数。
- #默认3,单位毫秒。如果设置为-1,就是对所有连接做空闲监测。
- numTestsPerEvictionRun=3
-
- #资源池中资源最小空闲时间(单位为毫秒),达到此值后将被移除。
- #默认值1000*60*30 = 30分钟
- minEvictableIdleTimeMillis=1800000
-
- #资源池中资源最小空闲时间(单位为毫秒),达到此值后将被移除。但是会保证minIdle
- #默认值-1
- #softMinEvictableIdleTimeMillis=-1
-
- #空闲资源回收策略
- #默认org.apache.commons.pool2.impl.DefaultEvictionPolicy
- #如果要自定义的话,需要实现EvictionPolicy重写evict方法
- evictionPolicyClassName=org.apache.commons.pool2.impl.DefaultEvictionPolicy
-
- #连接最大存活时间。非正数表示不限制
- #默认-1
- maxConnLifetimeMillis=-1
-
- #当达到maxConnLifetimeMillis被关闭时,是否打印相关消息
- #默认true
- #注意:maxConnLifetimeMillis设置为正数时,这个参数才有效
- logExpiredConnections=true
- ```
-
-
- ## 事务相关参数
-
- 这里的参数主要和事务相关,一般默认就行。
-
- ```properties
- #-------------事务相关的属性--------------------------------
- #连接池创建的连接的默认的auto-commit状态
- #默认为空,由驱动决定
- defaultAutoCommit=true
-
- #连接池创建的连接的默认的read-only状态。
- #默认值为空,由驱动决定
- defaultReadOnly=false
-
- #连接池创建的连接的默认的TransactionIsolation状态
- #可用值为下列之一:NONE,READ_UNCOMMITTED, READ_COMMITTED, REPEATABLE_READ, SERIALIZABLE
- #默认值为空,由驱动决定
- defaultTransactionIsolation=REPEATABLE_READ
-
- #归还连接时是否设置自动提交为true
- #默认true
- autoCommitOnReturn=true
-
- #归还连接时是否设置回滚事务
- #默认true
- rollbackOnReturn=true
-
- ```
-
- ## 连接泄漏回收参数
-
- 当我们从连接池获得了连接对象,但因为疏忽或其他原因没有`close`,这个时候这个连接对象就是一个泄露资源。通过配置以下参数可以回收这部分对象。
-
- ```properties
- #-------------连接泄漏回收参数--------------------------------
- #当未使用的时间超过removeAbandonedTimeout时,是否视该连接为泄露连接并删除(当getConnection()被调用时检测)
- #默认为false
- #注意:这个机制在(getNumIdle() < 2) and (getNumActive() > (getMaxActive() - 3))时被触发
- removeAbandonedOnBorrow=false
-
- #当未使用的时间超过removeAbandonedTimeout时,是否视该连接为泄露连接并删除(空闲evictor检测)
- #默认为false
- #注意:当空闲资源回收器开启才生效
- removeAbandonedOnMaintenance=false
-
- #泄露的连接可以被删除的超时值, 单位秒
- #默认为300
- removeAbandonedTimeout=300
-
- #标记当Statement或连接被泄露时是否打印程序的stack traces日志。
- #默认为false
- logAbandoned=true
-
- #这个不是很懂
- #默认为false
- abandonedUsageTracking=false
-
- ```
-
- ## 其他
-
- 这部分参数比较少用。
-
- ```properties
- #-------------其他--------------------------------
- #是否使用快速失败机制
- #默认为空,由驱动决定
- fastFailValidation=false
-
- #当使用快速失败机制时,设置触发的异常码
- #多个code用","隔开
- #disconnectionSqlCodes
-
- #borrow连接的顺序
- #默认true
- lifo=true
-
- #每个连接创建时执行的语句
- #connectionInitSqls=
-
- #连接参数:例如username、password、characterEncoding等都可以在这里设置
- #多个参数用";"隔开
- #connectionProperties=
-
- #指定数据源的jmx名。注意,配置了才能注册MBean
- jmxName=cn.zzs.jmx:type=BasicDataSource,name=zzs001
-
- #查询超时时间
- #默认为空,即根据驱动设置
- #defaultQueryTimeout=
-
- #控制PoolGuard是否容许获取底层连接
- #默认为false
- accessToUnderlyingConnectionAllowed=false
-
- #如果容许则可以使用下面的方式来获取底层物理连接:
- # Connection conn = ds.getConnection();
- # Connection dconn = ((DelegatingConnection) conn).getInnermostDelegate();
- # ...
- # conn.close();
- ```
-
-
- # 源码分析
-
- 注意:考虑篇幅和可读性,以下代码经过删减,仅保留所需部分。
-
- ## 创建数据源和连接池
-
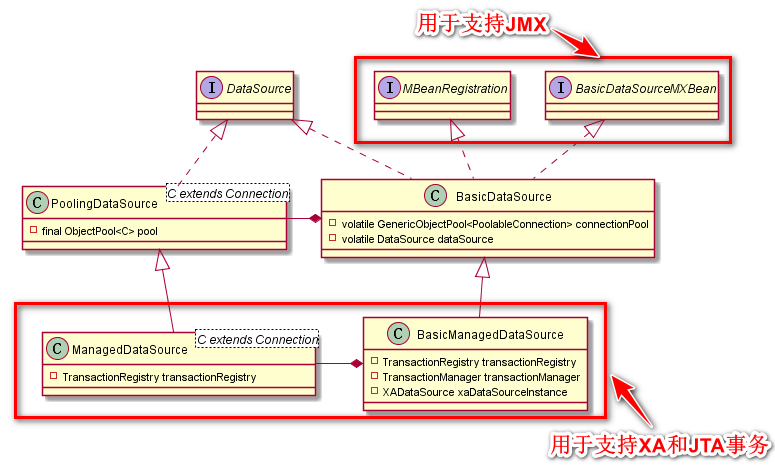
- 研究之前,先来看下`BasicDataSource`的`UML`图:
-
- 
-
- 这里介绍下这几个类的作用:
-
- 类名|描述
- -|-
- `BasicDataSource`|用于满足基本数据库操作需求的数据源
- `BasicManagedDataSource`|`BasicDataSource`的子类,用于创建支持`XA`事务或`JTA`事务的连接
- `PoolingDataSource`|`BasicDataSource`中实际调用的数据源,可以说`BasicDataSource`只是封装了`PoolingDataSource`
- `ManagedDataSource`|`PoolingDataSource`的子类,用于支持`XA`事务或`JTA`事务的连接。是`BasicManagedDataSource`中实际调用的数据源,可以说`BasicManagedDataSource`只是封装了`ManagedDataSource`
-
- 另外,为了支持`JNDI`,`DBCP`也提供了相应的类。
-
- | 类名 | 描述 |
- | ----------------------- | ------------------------------------------------------------ |
- | `InstanceKeyDataSource` | 用于支持`JDNI`环境的数据源 |
- | `PerUserPoolDataSource` | `InstanceKeyDataSource`的子类,针对每个用户会单独分配一个连接池,每个连接池可以设置不同属性。例如以下需求,相比user,`admin`可以创建更多地连接以保证 |
- | `SharedPoolDataSource` | `InstanceKeyDataSource`的子类,不同用户共享一个连接池 |
-
- 本文的源码分析仅会涉及到`BasicDataSource`(包含它封装的`PoolingDataSource`),其他的数据源暂时不扩展。
-
- ### BasicDataSource.getConnection()
-
- `BasicDataSourceFactory.createDataSource(Properties)`只是简单地`new`了一个`BasicDataSource`对象并初始化配置参数,此时真正的数据源(`PoolingDataSource`)以及连接池(`GenericObjectPool`)并没有创建,而创建的时机为我们第一次调用`getConnection()`的时候,如下:
-
- ```java
- public Connection getConnection() throws SQLException {
- return createDataSource().getConnection();
- }
- ```
-
- 但是,当我们设置了 initialSize > 0,则在`BasicDataSourceFactory.createDataSource(Properties)`时就会完成数据源和连接池的初始化。感谢[moranshouwang](https://home.cnblogs.com/u/901051/)的指正。
-
- 当然,过程都是相同的,只是时机不一样。下面从`BasicDataSource`的`createDataSource()`方法开始分析。
-
- ### BasicDataSource.createDataSource()
-
- 这个方法会创建数据源和连接池,整个过程可以概括为以下几步:
-
- 1. 注册`MBean`,用于支持`JMX`;
- 2. 创建连接池对象`GenericObjectPool<PoolableConnection>`;
- 3. 创建数据源对象`PoolingDataSource<PoolableConnection>`;
- 4. 初始化连接数;
- 5. 开启空闲资源回收线程(如果设置`timeBetweenEvictionRunsMillis`为正数)。
-
- ```java
- protected DataSource createDataSource() throws SQLException {
- if(closed) {
- throw new SQLException("Data source is closed");
- }
- if(dataSource != null) {
- return dataSource;
- }
-
- synchronized(this) {
- if(dataSource != null) {
- return dataSource;
- }
- // 注册MBean,用于支持JMX,这方面的内容不在这里扩展
- jmxRegister();
-
- // 创建原生Connection工厂:本质就是持有数据库驱动对象和几个连接参数
- final ConnectionFactory driverConnectionFactory = createConnectionFactory();
-
- // 将driverConnectionFactory包装成池化Connection工厂
- PoolableConnectionFactory poolableConnectionFactory = createPoolableConnectionFactory(driverConnectionFactory);
- // 设置PreparedStatements缓存(其实在这里可以发现,上面创建池化工厂时就设置了缓存,这里没必要再设置一遍)
- poolableConnectionFactory.setPoolStatements(poolPreparedStatements);
- poolableConnectionFactory.setMaxOpenPreparedStatements(maxOpenPreparedStatements);
-
- // 创建数据库连接池对象GenericObjectPool,用于管理连接
- // BasicDataSource将持有GenericObjectPool对象
- createConnectionPool(poolableConnectionFactory);
-
- // 创建PoolingDataSource对象
- // 该对象持有GenericObjectPool对象的引用
- DataSource newDataSource = createDataSourceInstance();
- newDataSource.setLogWriter(logWriter);
-
- // 根据我们设置的initialSize创建初始连接
- for(int i = 0; i < initialSize; i++) {
- connectionPool.addObject();
- }
-
- // 开启连接池的evictor线程
- startPoolMaintenance();
- // 最后BasicDataSource将持有上面创建的PoolingDataSource对象
- dataSource = newDataSource;
- return dataSource;
- }
- }
- ```
- 以上方法涉及到几个类,这里再补充下`UML`图。
-
- 
-
- | 类名 | 描述 |
- | --------------------------- | ------------------------------------------------------------ |
- | `DriverConnectionFactory` | 用于生成原生的Connection对象 |
- | `PoolableConnectionFactory` | 用于生成池化的Connection对象,持有`ConnectionFactory`对象的引用 |
- | `GenericObjectPool` | 数据库连接池,用于管理连接。持有`PoolableConnectionFactory`对象的引用 |
-
- ## 获取连接对象
-
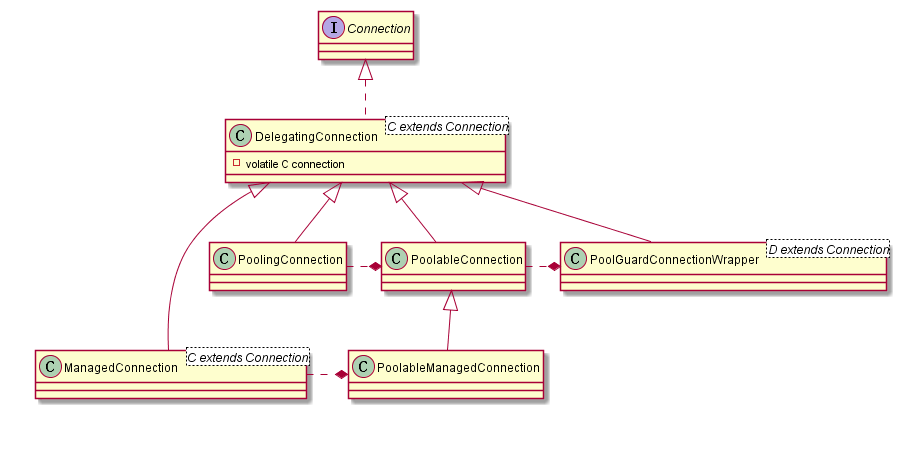
- 上面已经大致分析了数据源和连接池对象的获取过程,接下来研究下连接对象的获取。在此之前先了解下`DBCP`中几个`Connection`实现类。
-
- 
-
- 类名|描述
- -|-
- `DelegatingConnection`|`Connection`实现类,是以下几个类的父类
- `PoolingConnection`|用于包装原生的`Connection`,支持缓存`prepareStatement`和`prepareCall`
- `PoolableConnection`|用于包装原生的`PoolingConnection`(如果没有开启`poolPreparedStatements`,则包装的只是原生`Connection`),调用`close()`时只是将连接还给连接池
- `PoolableManagedConnection`|`PoolableConnection`的子类,用于包装`ManagedConnection`,支持`JTA`和`XA`事务
- `ManagedConnection`|用于包装原生的`Connection`,支持`JTA`和`XA`事务
- `PoolGuardConnectionWrapper`|用于包装`PoolableConnection`,当`accessToUnderlyingConnectionAllowed`才能获取底层连接对象。我们获取到的就是这个对象
-
- 另外,这里先概括下获得连接的整个过程:
-
- 1. 如果设置了`removeAbandonedOnBorrow`,达到条件会进行检测;
- 2. 从连接池中获取连接,如果没有就通过工厂创建(通过`DriverConnectionFactory`创建原生对象,再通过`PoolableConnectionFactory`包装为池化对象);
- 3. 通过工厂重新初始化连接对象;
- 4. 如果设置了`testOnBorrow`或者`testOnCreate`,会通过工厂校验连接有效性;
- 5. 使用`PoolGuardConnectionWrapper`包装连接对象,并返回给客户端
-
- ### PoolingDataSource.getConnection()
-
- 前面已经说过,`BasicDataSource`本质上是调用`PoolingDataSource`的方法来获取连接,所以这里从`PoolingDataSource.getConnection()`开始研究。
-
- 以下代码可知,该方法会从连接池中“借出”连接。
-
- ```java
- public Connection getConnection() throws SQLException {
- // 这个泛型C指的是PoolableConnection对象
- // 调用的是GenericObjectPool的方法返回PoolableConnection对象,这个方法后面会展开
- final C conn = pool.borrowObject();
- if (conn == null) {
- return null;
- }
- // 包装PoolableConnection对象,当accessToUnderlyingConnectionAllowed为true时,可以使用底层连接
- return new PoolGuardConnectionWrapper<>(conn);
- }
- ```
-
- ### GenericObjectPool.borrowObject()
-
- `GenericObjectPool`是一个很简练的类,里面涉及到的属性设置和锁机制都涉及得非常巧妙。
-
- ```java
- // 存放着连接池所有的连接对象(但不包含已经释放的)
- private final Map<IdentityWrapper<T>, PooledObject<T>> allObjects =
- new ConcurrentHashMap<>();
- // 存放着空闲连接对象的阻塞队列
- private final LinkedBlockingDeque<PooledObject<T>> idleObjects;
- // 为n>1表示当前有n个线程正在创建新连接对象
- private long makeObjectCount = 0;
- // 创建连接对象时所用的锁
- private final Object makeObjectCountLock = new Object();
- // 连接对象创建总数量
- private final AtomicLong createCount = new AtomicLong(0);
-
- public T borrowObject() throws Exception {
- // 如果我们设置了连接获取等待时间,“借出”过程就必须在指定时间内完成
- return borrowObject(getMaxWaitMillis());
- }
-
- public T borrowObject(final long borrowMaxWaitMillis) throws Exception {
- // 校验连接池是否打开状态
- assertOpen();
-
- // 如果设置了removeAbandonedOnBorrow,达到触发条件是会遍历所有连接,未使用时长超过removeAbandonedTimeout的将被释放掉(一般可以检测出泄露连接)
- final AbandonedConfig ac = this.abandonedConfig;
- if (ac != null && ac.getRemoveAbandonedOnBorrow() &&
- (getNumIdle() < 2) &&
- (getNumActive() > getMaxTotal() - 3) ) {
- removeAbandoned(ac);
- }
-
-
- PooledObject<T> p = null;
- // 连接数达到maxTotal是否阻塞等待
- final boolean blockWhenExhausted = getBlockWhenExhausted();
-
- boolean create;
- final long waitTime = System.currentTimeMillis();
-
- // 如果获取的连接对象为空,会再次进入获取
- while (p == null) {
- create = false;
- // 获取空闲队列的第一个元素,如果为空就试图创建新连接
- p = idleObjects.pollFirst();
- if (p == null) {
- // 后面分析这个方法
- p = create();
- if (p != null) {
- create = true;
- }
- }
- // 连接数达到maxTotal且暂时没有空闲连接,这时需要阻塞等待,直到获得空闲队列中的连接或等待超时
- if (blockWhenExhausted) {
- if (p == null) {
- if (borrowMaxWaitMillis < 0) {
- // 无限等待
- p = idleObjects.takeFirst();
- } else {
- // 等待maxWaitMillis
- p = idleObjects.pollFirst(borrowMaxWaitMillis,
- TimeUnit.MILLISECONDS);
- }
- }
- // 这个时候还是没有就只能抛出异常
- if (p == null) {
- throw new NoSuchElementException(
- "Timeout waiting for idle object");
- }
- } else {
- if (p == null) {
- throw new NoSuchElementException("Pool exhausted");
- }
- }
- // 如果连接处于空闲状态,会修改连接的state、lastBorrowTime、lastUseTime、borrowedCount等,并返回true
- if (!p.allocate()) {
- p = null;
- }
-
- if (p != null) {
- // 利用工厂重新初始化连接对象,这里会去校验连接存活时间、设置lastUsedTime、及其他初始参数
- try {
- factory.activateObject(p);
- } catch (final Exception e) {
- try {
- destroy(p);
- } catch (final Exception e1) {
- // Ignore - activation failure is more important
- }
- p = null;
- if (create) {
- final NoSuchElementException nsee = new NoSuchElementException(
- "Unable to activate object");
- nsee.initCause(e);
- throw nsee;
- }
- }
- // 根据设置的参数,判断是否检测连接有效性
- if (p != null && (getTestOnBorrow() || create && getTestOnCreate())) {
- boolean validate = false;
- Throwable validationThrowable = null;
- try {
- // 这里会去校验连接的存活时间是否超过maxConnLifetimeMillis,以及通过SQL去校验执行时间
- validate = factory.validateObject(p);
- } catch (final Throwable t) {
- PoolUtils.checkRethrow(t);
- validationThrowable = t;
- }
- // 如果校验不通过,会释放该对象
- if (!validate) {
- try {
- destroy(p);
- destroyedByBorrowValidationCount.incrementAndGet();
- } catch (final Exception e) {
- // Ignore - validation failure is more important
- }
- p = null;
- if (create) {
- final NoSuchElementException nsee = new NoSuchElementException(
- "Unable to validate object");
- nsee.initCause(validationThrowable);
- throw nsee;
- }
- }
- }
- }
- }
- // 更新borrowedCount、idleTimes和waitTimes
- updateStatsBorrow(p, System.currentTimeMillis() - waitTime);
-
- return p.getObject();
- }
- ```
- ### GenericObjectPool.create()
-
- 这里在创建连接对象时采用的锁机制非常值得学习,简练且高效。
-
- ```java
- private PooledObject<T> create() throws Exception {
- int localMaxTotal = getMaxTotal();
- if (localMaxTotal < 0) {
- localMaxTotal = Integer.MAX_VALUE;
- }
-
- final long localStartTimeMillis = System.currentTimeMillis();
- final long localMaxWaitTimeMillis = Math.max(getMaxWaitMillis(), 0);
-
- // 创建标识:
- // - TRUE: 调用工厂创建返回对象
- // - FALSE: 直接返回null
- // - null: 继续循环
- Boolean create = null;
- while (create == null) {
- synchronized (makeObjectCountLock) {
- final long newCreateCount = createCount.incrementAndGet();
- if (newCreateCount > localMaxTotal) {
- // 当前池已经达到maxTotal,或者有另外一个线程正在试图创建一个新的连接使之达到容量极限
- createCount.decrementAndGet();
- if (makeObjectCount == 0) {
- // 连接池确实已达到容量极限
- create = Boolean.FALSE;
- } else {
- // 当前另外一个线程正在试图创建一个新的连接使之达到容量极限,此时需要等待
- makeObjectCountLock.wait(localMaxWaitTimeMillis);
- }
- } else {
- // 当前连接池容量未到达极限,可以继续创建连接对象
- makeObjectCount++;
- create = Boolean.TRUE;
- }
- }
-
- // 当达到maxWaitTimeMillis时不创建连接对象,直接退出循环
- if (create == null &&
- (localMaxWaitTimeMillis > 0 &&
- System.currentTimeMillis() - localStartTimeMillis >= localMaxWaitTimeMillis)) {
- create = Boolean.FALSE;
- }
- }
-
- if (!create.booleanValue()) {
- return null;
- }
-
- final PooledObject<T> p;
- try {
- // 调用工厂创建对象,后面对这个方法展开分析
- p = factory.makeObject();
- } catch (final Throwable e) {
- createCount.decrementAndGet();
- throw e;
- } finally {
- synchronized (makeObjectCountLock) {
- // 创建标识-1
- makeObjectCount--;
- // 唤醒makeObjectCountLock锁住的对象
- makeObjectCountLock.notifyAll();
- }
- }
-
- final AbandonedConfig ac = this.abandonedConfig;
- if (ac != null && ac.getLogAbandoned()) {
- p.setLogAbandoned(true);
- // TODO: in 3.0, this can use the method defined on PooledObject
- if (p instanceof DefaultPooledObject<?>) {
- ((DefaultPooledObject<T>) p).setRequireFullStackTrace(ac.getRequireFullStackTrace());
- }
- }
- // 连接数量+1
- createdCount.incrementAndGet();
- // 将创建的对象放入allObjects
- allObjects.put(new IdentityWrapper<>(p.getObject()), p);
- return p;
- }
-
- ```
-
- ### PoolableConnectionFactory.makeObject()
- ```java
- public PooledObject<PoolableConnection> makeObject() throws Exception {
- // 创建原生的Connection对象
- Connection conn = connectionFactory.createConnection();
- if (conn == null) {
- throw new IllegalStateException("Connection factory returned null from createConnection");
- }
- try {
- // 执行我们设置的connectionInitSqls
- initializeConnection(conn);
- } catch (final SQLException sqle) {
- // Make sure the connection is closed
- try {
- conn.close();
- } catch (final SQLException ignore) {
- // ignore
- }
- // Rethrow original exception so it is visible to caller
- throw sqle;
- }
- // 连接索引+1
- final long connIndex = connectionIndex.getAndIncrement();
-
- // 如果设置了poolPreparedStatements,则创建包装连接为PoolingConnection对象
- if (poolStatements) {
- conn = new PoolingConnection(conn);
- final GenericKeyedObjectPoolConfig<DelegatingPreparedStatement> config = new GenericKeyedObjectPoolConfig<>();
- config.setMaxTotalPerKey(-1);
- config.setBlockWhenExhausted(false);
- config.setMaxWaitMillis(0);
- config.setMaxIdlePerKey(1);
- config.setMaxTotal(maxOpenPreparedStatements);
- if (dataSourceJmxObjectName != null) {
- final StringBuilder base = new StringBuilder(dataSourceJmxObjectName.toString());
- base.append(Constants.JMX_CONNECTION_BASE_EXT);
- base.append(Long.toString(connIndex));
- config.setJmxNameBase(base.toString());
- config.setJmxNamePrefix(Constants.JMX_STATEMENT_POOL_PREFIX);
- } else {
- config.setJmxEnabled(false);
- }
- final PoolingConnection poolingConn = (PoolingConnection) conn;
- final KeyedObjectPool<PStmtKey, DelegatingPreparedStatement> stmtPool = new GenericKeyedObjectPool<>(
- poolingConn, config);
- poolingConn.setStatementPool(stmtPool);
- poolingConn.setCacheState(cacheState);
- }
-
- // 用于注册连接到JMX
- ObjectName connJmxName;
- if (dataSourceJmxObjectName == null) {
- connJmxName = null;
- } else {
- connJmxName = new ObjectName(
- dataSourceJmxObjectName.toString() + Constants.JMX_CONNECTION_BASE_EXT + connIndex);
- }
-
- // 创建PoolableConnection对象
- final PoolableConnection pc = new PoolableConnection(conn, pool, connJmxName, disconnectionSqlCodes,
- fastFailValidation);
- pc.setCacheState(cacheState);
-
- // 包装成连接池所需的对象
- return new DefaultPooledObject<>(pc);
- }
- ```
-
- ## 空闲对象回收器Evictor
-
- 以上基本已分析完连接对象的获取过程,下面再研究下空闲对象回收器。前面已经讲到当创建完数据源对象时会开启连接池的`evictor`线程,所以我们从`BasicDataSource.startPoolMaintenance()`开始分析。
-
- ### BasicDataSource.startPoolMaintenance()
-
- 前面说过`timeBetweenEvictionRunsMillis`为非正数时不会开启开启空闲对象回收器,从以下代码可以理解具体逻辑。
-
- ```java
- protected void startPoolMaintenance() {
- // 只有timeBetweenEvictionRunsMillis为正数,才会开启空闲对象回收器
- if (connectionPool != null && timeBetweenEvictionRunsMillis > 0) {
- connectionPool.setTimeBetweenEvictionRunsMillis(timeBetweenEvictionRunsMillis);
- }
- }
- ```
- ### BaseGenericObjectPool.setTimeBetweenEvictionRunsMillis(long)
-
- 这个`BaseGenericObjectPool`是上面说到的`GenericObjectPool`的父类。
-
- ```java
- public final void setTimeBetweenEvictionRunsMillis(
- final long timeBetweenEvictionRunsMillis) {
- // 设置回收线程运行间隔时间
- this.timeBetweenEvictionRunsMillis = timeBetweenEvictionRunsMillis;
- // 继续调用本类的方法,下面继续进入方法分析
- startEvictor(timeBetweenEvictionRunsMillis);
- }
- ```
-
- ### BaseGenericObjectPool.startEvictor(long)
-
- 这里会去定义一个`Evictor`对象,这个其实是一个`Runnable`对象,后面会讲到。
-
- ```java
- final void startEvictor(final long delay) {
- synchronized (evictionLock) {
- if (null != evictor) {
- EvictionTimer.cancel(evictor, evictorShutdownTimeoutMillis, TimeUnit.MILLISECONDS);
- evictor = null;
- evictionIterator = null;
- }
- // 创建回收器任务,并执行定时调度
- if (delay > 0) {
- evictor = new Evictor();
- EvictionTimer.schedule(evictor, delay, delay);
- }
- }
- }
- ```
-
- ### EvictionTimer.schedule(Evictor, long, long)
-
- `DBCP`是使用`ScheduledThreadPoolExecutor`来实现回收器的定时检测。 涉及到`ThreadPoolExecutor`为`JDK`自带的`api`,这里不再深入分析线程池如何实现定时调度。感兴趣的朋友可以复习下常用的几款线程池。
-
- ```java
- static synchronized void schedule(
- final BaseGenericObjectPool<?>.Evictor task, final long delay, final long period)
- if (null == executor) {
- // 创建线程池,队列为DelayedWorkQueue,corePoolSize为1,maximumPoolSize为无限大
- executor = new ScheduledThreadPoolExecutor(1, new EvictorThreadFactory());
- // 当任务被取消的同时从等待队列中移除
- executor.setRemoveOnCancelPolicy(true);
- }
- // 设置任务定时调度
- final ScheduledFuture<?> scheduledFuture =
- executor.scheduleWithFixedDelay(task, delay, period, TimeUnit.MILLISECONDS);
- task.setScheduledFuture(scheduledFuture);
- }
- ```
- ### BaseGenericObjectPool.Evictor
-
- `Evictor`是`BaseGenericObjectPool`的内部类,实现了`Runnable`接口,这里看下它的run方法。
-
- ```java
- class Evictor implements Runnable {
-
- private ScheduledFuture<?> scheduledFuture;
-
- @Override
- public void run() {
- final ClassLoader savedClassLoader =
- Thread.currentThread().getContextClassLoader();
- try {
- // 确保回收器使用的类加载器和工厂对象的一样
- if (factoryClassLoader != null) {
- final ClassLoader cl = factoryClassLoader.get();
- if (cl == null) {
- cancel();
- return;
- }
- Thread.currentThread().setContextClassLoader(cl);
- }
-
-
- try {
- // 回收符合条件的对象,后面继续扩展
- evict();
- } catch(final Exception e) {
- swallowException(e);
- } catch(final OutOfMemoryError oome) {
- // Log problem but give evictor thread a chance to continue
- // in case error is recoverable
- oome.printStackTrace(System.err);
- }
- try {
- // 确保最小空闲对象
- ensureMinIdle();
- } catch (final Exception e) {
- swallowException(e);
- }
- } finally {
- Thread.currentThread().setContextClassLoader(savedClassLoader);
- }
- }
-
-
- void setScheduledFuture(final ScheduledFuture<?> scheduledFuture) {
- this.scheduledFuture = scheduledFuture;
- }
-
-
- void cancel() {
- scheduledFuture.cancel(false);
- }
- }
- ```
-
- ### GenericObjectPool.evict()
-
- 这里的回收过程包括以下四道校验:
-
- 1. 按照`evictionPolicy`校验`idleSoftEvictTime`、`idleEvictTime`;
-
- 2. 利用工厂重新初始化样本,这里会校验`maxConnLifetimeMillis`(`testWhileIdle`为true);
-
- 3. 校验`maxConnLifetimeMillis`和`validationQueryTimeout`(`testWhileIdle`为true);
-
- 4. 校验所有连接的未使用时间是否超过r`emoveAbandonedTimeout`(`removeAbandonedOnMaintenance`为true)。
-
- ```java
- public void evict() throws Exception {
- // 校验当前连接池是否关闭
- assertOpen();
-
- if (idleObjects.size() > 0) {
-
- PooledObject<T> underTest = null;
- // 介绍参数时已经讲到,这个evictionPolicy我们可以自定义
- final EvictionPolicy<T> evictionPolicy = getEvictionPolicy();
-
- synchronized (evictionLock) {
- final EvictionConfig evictionConfig = new EvictionConfig(
- getMinEvictableIdleTimeMillis(),
- getSoftMinEvictableIdleTimeMillis(),
- getMinIdle());
-
- final boolean testWhileIdle = getTestWhileIdle();
- // 获取我们指定的样本数,并开始遍历
- for (int i = 0, m = getNumTests(); i < m; i++) {
- if (evictionIterator == null || !evictionIterator.hasNext()) {
- evictionIterator = new EvictionIterator(idleObjects);
- }
- if (!evictionIterator.hasNext()) {
- // Pool exhausted, nothing to do here
- return;
- }
-
- try {
- underTest = evictionIterator.next();
- } catch (final NoSuchElementException nsee) {
- // 当前样本正被另一个线程借出
- i--;
- evictionIterator = null;
- continue;
- }
- // 判断如果样本是空闲状态,设置为EVICTION状态
- // 如果不是,说明另一个线程已经借出了这个样本
- if (!underTest.startEvictionTest()) {
- i--;
- continue;
- }
-
- boolean evict;
- try {
- // 调用回收策略来判断是否回收该样本,按照默认策略,以下情况都会返回true:
- // 1. 样本空闲时间大于我们设置的idleSoftEvictTime,且当前池中空闲连接数量>minIdle
- // 2. 样本空闲时间大于我们设置的idleEvictTime
- evict = evictionPolicy.evict(evictionConfig, underTest,
- idleObjects.size());
- } catch (final Throwable t) {
- PoolUtils.checkRethrow(t);
- swallowException(new Exception(t));
- evict = false;
- }
- // 如果需要回收,则释放这个样本
- if (evict) {
- destroy(underTest);
- destroyedByEvictorCount.incrementAndGet();
- } else {
- // 如果设置了testWhileIdle,会
- if (testWhileIdle) {
- boolean active = false;
- try {
- // 利用工厂重新初始化样本,这里会校验maxConnLifetimeMillis
- factory.activateObject(underTest);
- active = true;
- } catch (final Exception e) {
- // 抛出异常标识校验不通过,释放样本
- destroy(underTest);
- destroyedByEvictorCount.incrementAndGet();
- }
- if (active) {
- // 接下来会校验maxConnLifetimeMillis和validationQueryTimeout
- if (!factory.validateObject(underTest)) {
- destroy(underTest);
- destroyedByEvictorCount.incrementAndGet();
- } else {
- try {
- // 这里会将样本rollbackOnReturn、autoCommitOnReturn等
- factory.passivateObject(underTest);
- } catch (final Exception e) {
- destroy(underTest);
- destroyedByEvictorCount.incrementAndGet();
- }
- }
- }
- }
- // 如果状态为EVICTION或EVICTION_RETURN_TO_HEAD,修改为IDLE
- if (!underTest.endEvictionTest(idleObjects)) {
- //空
- }
- }
- }
- }
- }
- // 校验所有连接的未使用时间是否超过removeAbandonedTimeout
- final AbandonedConfig ac = this.abandonedConfig;
- if (ac != null && ac.getRemoveAbandonedOnMaintenance()) {
- removeAbandoned(ac);
- }
- }
- ```
- 以上已基本研究完数据源创建、连接对象获取和空闲资源回收器,后续有空再做补充。
-
-
-
- # 通过JNDI获取数据源对象
-
- ## 需求
-
- 本文测试使用`JNDI`获取`PerUserPoolDataSource`和`SharedPoolDataSource`对象,选择使用`tomcat 9.0.21`作容器。
-
- 如果之前没有接触过`JNDI`,并不会影响下面例子的理解,其实可以理解为像`spring`的`bean`配置和获取。
-
- 源码分析时已经讲到,除了我们熟知的`BasicDataSource`,`DBCP`还提供了通过`JDNI`获取数据源,如下表。
-
- | 类名 | 描述 |
- | ----------------------- | ------------------------------------------------------------ |
- | `InstanceKeyDataSource` | 用于支持`JDNI`环境的数据源,是以下两个类的父类 |
- | `PerUserPoolDataSource` | `InstanceKeyDataSource`的子类,针对每个用户会单独分配一个连接池,每个连接池可以设置不同属性。例如以下需求,相比user,`admin`可以创建更多地连接以保证 |
- | `SharedPoolDataSource` | `InstanceKeyDataSource`的子类,不同用户共享一个连接池 |
-
- ## 引入依赖
-
- 本文在前面例子的基础上增加以下依赖,因为是web项目,所以打包方式为`war`:
-
- ```xml
- <dependency>
- <groupId>javax.servlet</groupId>
- <artifactId>jstl</artifactId>
- <version>1.2</version>
- <scope>provided</scope>
- </dependency>
- <dependency>
- <groupId>javax.servlet</groupId>
- <artifactId>javax.servlet-api</artifactId>
- <version>3.1.0</version>
- <scope>provided</scope>
- </dependency>
- <dependency>
- <groupId>javax.servlet.jsp</groupId>
- <artifactId>javax.servlet.jsp-api</artifactId>
- <version>2.2.1</version>
- <scope>provided</scope>
- </dependency>
- ```
-
- ## 编写context.xml
-
- 在`webapp`文件下创建目录`META-INF`,并创建`context.xml`文件。这里面的每个`resource`节点都是我们配置的对象,类似于`spring`的`bean`节点。其中`bean/DriverAdapterCPDS`这个对象需要被另外两个使用到。
-
- ```xml
- <?xml version="1.0" encoding="UTF-8"?>
- <Context>
- <Resource
- name="bean/SharedPoolDataSourceFactory"
- auth="Container"
- type="org.apache.commons.dbcp2.datasources.SharedPoolDataSource"
- factory="org.apache.commons.dbcp2.datasources.SharedPoolDataSourceFactory"
- singleton="false"
- driverClassName="com.mysql.cj.jdbc.Driver"
- url="jdbc:mysql://localhost:3306/github_demo?useUnicode=true&characterEncoding=utf8&serverTimezone=GMT%2B8&useSSL=true"
- username="root"
- password="root"
- maxTotal="8"
- maxIdle="10"
- dataSourceName="java:comp/env/bean/DriverAdapterCPDS"
- />
- <Resource
- name="bean/PerUserPoolDataSourceFactory"
- auth="Container"
- type="org.apache.commons.dbcp2.datasources.PerUserPoolDataSource"
- factory="org.apache.commons.dbcp2.datasources.PerUserPoolDataSourceFactory"
- singleton="false"
- driverClassName="com.mysql.cj.jdbc.Driver"
- url="jdbc:mysql://localhost:3306/github_demo?useUnicode=true&characterEncoding=utf8&serverTimezone=GMT%2B8&useSSL=true"
- username="root"
- password="root"
- maxTotal="8"
- maxIdle="10"
- dataSourceName="java:comp/env/bean/DriverAdapterCPDS"
- />
- <Resource
- name="bean/DriverAdapterCPDS"
- auth="Container"
- type="org.apache.commons.dbcp2.cpdsadapter.DriverAdapterCPDS"
- factory="org.apache.commons.dbcp2.cpdsadapter.DriverAdapterCPDS"
- singleton="false"
- driverClassName="com.mysql.cj.jdbc.Driver"
- url="jdbc:mysql://localhost:3306/github_demo?useUnicode=true&characterEncoding=utf8&serverTimezone=GMT%2B8&useSSL=true"
- userName="root"
- userPassword="root"
- maxIdle="10"
- />
- </Context>
- ```
-
- ## 编写web.xml
-
- 在`web-app`节点下配置资源引用,每个`resource-env-ref`指向了我们配置好的对象。
-
- ```xml
- <resource-env-ref>
- <description>Test DriverAdapterCPDS</description>
- <resource-env-ref-name>bean/DriverAdapterCPDS</resource-env-ref-name>
- <resource-env-ref-type>org.apache.commons.dbcp2.cpdsadapter.DriverAdapterCPDS</resource-env-ref-type>
- </resource-env-ref>
- <resource-env-ref>
- <description>Test SharedPoolDataSource</description>
- <resource-env-ref-name>bean/SharedPoolDataSourceFactory</resource-env-ref-name>
- <resource-env-ref-type>org.apache.commons.dbcp2.datasources.SharedPoolDataSource</resource-env-ref-type>
- </resource-env-ref>
- <resource-env-ref>
- <description>Test erUserPoolDataSource</description>
- <resource-env-ref-name>bean/erUserPoolDataSourceFactory</resource-env-ref-name>
- <resource-env-ref-type>org.apache.commons.dbcp2.datasources.erUserPoolDataSource</resource-env-ref-type>
- </resource-env-ref>
- ```
-
- ## 编写jsp
-
- 因为需要在`web`环境中使用,如果直接建类写个`main`方法测试,会一直报错的,目前没找到好的办法。这里就简单地使用`jsp`来测试吧(这是从tomcat官网参照的例子)。
-
- ```jsp
- <body>
- <%
- // 获得名称服务的上下文对象
- Context initCtx = new InitialContext();
- Context envCtx = (Context)initCtx.lookup("java:comp/env/");
-
- // 查找指定名字的对象
- DataSource ds = (DataSource)envCtx.lookup("bean/SharedPoolDataSourceFactory");
-
- DataSource ds2 = (DataSource)envCtx.lookup("bean/PerUserPoolDataSourceFactory");
- // 获取连接
- Connection conn = ds.getConnection("root","root");
- System.out.println("conn" + conn);
- Connection conn2 = ds2.getConnection("zzf","zzf");
- System.out.println("conn2" + conn2);
-
- // ... 使用连接操作数据库,以及释放资源 ...
- conn.close();
- conn2.close();
- %>
- </body>
- ```
-
- ## 测试结果
-
- 打包项目在`tomcat9`上运行,访问 http://localhost:8080/DBCP-demo/testInstanceKeyDataSource.jsp ,控制台打印如下内容:
-
- ```
- conn=1971654708, URL=jdbc:mysql://localhost:3306/github_demo?useUnicode=true&characterEncoding=utf8&serverTimezone=GMT%2B8&useSSL=true, UserName=root@localhost, MySQL Connector/J
- conn2=128868782, URL=jdbc:mysql://localhost:3306/github_demo?useUnicode=true&characterEncoding=utf8&serverTimezone=GMT%2B8&useSSL=true, UserName=zzf@localhost, MySQL Connector/J
- ```
-
-
-
- # 使用DBCP测试两阶段提交
-
- 前面源码分析已经讲到,以下类用于支持`JTA`事务。本文将介绍如何使用`DBCP`来实现`JTA`事务两阶段提交(当然,实际项目并不支持使用`2PC`,因为性能开销太大)。
-
- | 类名 | 描述 |
- | ------------------------ | ------------------------------------------------------------ |
- | `BasicManagedDataSource` | `BasicDataSource`的子类,用于创建支持`XA`事务或`JTA`事务的连接 |
- | `ManagedDataSource` | `PoolingDataSource`的子类,用于支持`XA`事务或`JTA`事务的连接。是`BasicManagedDataSource`中实际调用的数据源,可以说`BasicManagedDataSource`只是封装了`ManagedDataSource` |
-
- ## 准备工作
-
- 因为测试例子使用的是`mysql`,使用`XA`事务需要开启支持。注意,`mysql`只有`innoDB`引擎才支持(另外,`XA`事务和常规事务是互斥的,如果开启了`XA`事务,其他线程进来即使只读也是不行的)。
-
- ```sql
- SHOW VARIABLES LIKE '%xa%' -- 查看XA事务是否开启
- SET innodb_support_xa = ON -- 开启XA事务
- ```
-
- 除了原来的`github_demo`数据库,我另外建了一个`test`数据库,简单地模拟两个数据库。
-
- ## mysql的XA事务使用
-
- 测试之前,这里简单回顾下直接使用`sql`操作`XA`事务的过程,将有助于对以下内容的理解:
-
- ```sql
- XA START 'my_test_xa'; -- 启动一个xid为my_test_xa的事务,并使之为active状态
- UPDATE github_demo.demo_user SET deleted = 1 WHERE id = '1'; -- 事务中的语句
- XA END 'my_test_xa'; -- 把事务置为idle状态
- XA PREPARE 'my_test_xa'; -- 把事务置为prepare状态
- XA COMMIT 'my_test_xa'; -- 提交事务
- XA ROLLBACK 'my_test_xa'; -- 回滚事务
- XA RECOVER; -- 查看处于prepare状态的事务列表
- ```
-
- ## 引入依赖
-
- 在入门例子的基础上,增加以下依赖,本文采用第三方`atomikos`的实现。
-
- ```xml
- <!-- jta:用于测试DBCP对JTA事务的支持 -->
- <dependency>
- <groupId>javax.transaction</groupId>
- <artifactId>jta</artifactId>
- <version>1.1</version>
- </dependency>
- <dependency>
- <groupId>com.atomikos</groupId>
- <artifactId>transactions-jdbc</artifactId>
- <version>3.9.3</version>
- </dependency>
- ```
-
- ## 获取BasicManagedDataSource
-
- 这里千万记得要设置`DefaultCatalog`,否则当前事务中注册不同资源管理器时,可能都会被当成同一个资源管理器而拒绝注册并报错,因为这个问题,花了我好长时间才解决。
-
- ```java
- public BasicManagedDataSource getBasicManagedDataSource(
- TransactionManager transactionManager,
- String url,
- String username,
- String password) {
- BasicManagedDataSource basicManagedDataSource = new BasicManagedDataSource();
- basicManagedDataSource.setTransactionManager(transactionManager);
- basicManagedDataSource.setUrl(url);
- basicManagedDataSource.setUsername(username);
- basicManagedDataSource.setPassword(password);
- basicManagedDataSource.setDefaultAutoCommit(false);
- basicManagedDataSource.setXADataSource("com.mysql.cj.jdbc.MysqlXADataSource");
- return basicManagedDataSource;
- }
- @Test
- public void test01() throws Exception {
- // 获得事务管理器
- TransactionManager transactionManager = new UserTransactionManager();
-
- // 获取第一个数据库的数据源
- BasicManagedDataSource basicManagedDataSource1 = getBasicManagedDataSource(
- transactionManager,
- "jdbc:mysql://localhost:3306/github_demo?useUnicode=true&characterEncoding=utf8&serverTimezone=GMT%2B8&useSSL=true",
- "root",
- "root");
- // 注意,这一步非常重要
- basicManagedDataSource1.setDefaultCatalog("github_demo");
-
- // 获取第二个数据库的数据源
- BasicManagedDataSource basicManagedDataSource2 = getBasicManagedDataSource(
- transactionManager,
- "jdbc:mysql://localhost:3306/test?useUnicode=true&characterEncoding=utf8&serverTimezone=GMT%2B8&useSSL=true",
- "zzf",
- "zzf");
- // 注意,这一步非常重要
- basicManagedDataSource1.setDefaultCatalog("test");
- }
- ```
-
- ## 编写两阶段提交的代码
-
- 通过运行代码可以发现,当数据库1和2的操作都成功,才会提交,只要其中一个数据库执行失败,两个操作都会回滚。
-
- ```java
- @Test
- public void test01() throws Exception {
- Connection connection1 = null;
- Statement statement1 = null;
- Connection connection2 = null;
- Statement statement2 = null;
- transactionManager.begin();
- try {
- // 获取连接并进行数据库操作,这里会将会将XAResource注册到当前线程的XA事务对象
- /**
- * XA START xid1;-- 启动一个事务,并使之为active状态
- */
- connection1 = basicManagedDataSource1.getConnection();
- statement1 = connection1.createStatement();
- /**
- * update github_demo.demo_user set deleted = 1 where id = '1'; -- 事务中的语句
- */
- boolean result1 = statement1.execute("update github_demo.demo_user set deleted = 1 where id = '1'");
- System.out.println(result1);
-
- /**
- * XA START xid2;-- 启动一个事务,并使之为active状态
- */
- connection2 = basicManagedDataSource2.getConnection();
- statement2 = connection2.createStatement();
- /**
- * update test.demo_user set deleted = 1 where id = '1'; -- 事务中的语句
- */
- boolean result2 = statement2.execute("update test.demo_user set deleted = 1 where id = '1'");
- System.out.println(result2);
-
- /**
- * 当这执行以下语句:
- * XA END xid1; -- 把事务置为idle状态
- * XA PREPARE xid1; -- 把事务置为prepare状态
- * XA END xid2; -- 把事务置为idle状态
- * XA PREPARE xid2; -- 把事务置为prepare状态
- * XA COMMIT xid1; -- 提交事务
- * XA COMMIT xid2; -- 提交事务
- */
- transactionManager.commit();
- } catch(Exception e) {
- e.printStackTrace();
- } finally {
- statement1.close();
- statement2.close();
- connection1.close();
- connection2.close();
- }
- }
- ```
-
- > 相关源码请移步:https://github.com/ZhangZiSheng001/dbcp-demo
-
- > 本文为原创文章,转载请附上原文出处链接:https://www.cnblogs.com/ZhangZiSheng001/p/12003922.html
|
